EDS Project Setup
Setup guide for an AEM Edge Delivery Services project. Covers the GitHub repository, aem-code-sync, fstab.yaml, local development, and the first page render.
Content Objective
This chapter covers:
- The exact files that make up an EDS project and what each one does
- How to connect GitHub, AEM Cloud, and the EDS Edge Network
- The two artifacts you need — your code repo and a provisioned AEM site
- How to provision an AEM author site (UE trial vs site template import)
- The Cloud config that points your AEM site at your GitHub repo — and the mistakes that hide your blocks
- What
fstab.yamldoes and why getting it wrong breaks everything - How the local development server works and what it actually proxies
- How content flows from AEM Cloud to your browser during development
- Common setup errors and how to diagnose them
Before writing a single block, you need to understand the wiring that connects your GitHub code to your AEM content and the EDS edge network.
Most developers skip this step. They clone the boilerplate, run aem up, see something in the browser, and start building blocks without understanding what is actually happening.
That approach works until something breaks. Then debugging becomes guesswork.
If you understand the setup wiring, you can diagnose almost any EDS environment issue in minutes rather than hours.
The Three Things That Must Connect
An EDS project has three independent systems that must be connected correctly for anything to work: the GitHub repository holds your code (blocks, scripts, styles), the AEM Cloud instance holds your content (pages, assets, component models), and the EDS edge network delivers the page to users. The aem-code-sync app connects the repository to the edge, and fstab.yaml connects the edge to AEM.

If any connection breaks, the site does not work. Understanding which connection is broken is the key to fast debugging.
Two Artifacts: Your Code and the AEM Site
The diagram above hides a subtlety that cost us the most time during setup. On the AEM side there are actually two separate things that must both exist, and they are created in completely different ways:
| Artifact | What it is | Where it lives | Created by |
|---|---|---|---|
| GitHub repo | Block JS/CSS, scripts.js, the three UE JSON configs | GitHub | You (from the boilerplate) |
| AEM site | The JCR page nodes, Cloud config, and site structure UE writes into | AEM Cloud author | A site template or a provisioned trial |
The GitHub repo handles delivery — what gets served on .aem.page / .aem.live.
The AEM site handles authoring — the page nodes Universal Editor saves to.
You need both, and they are loosely coupled. A repo with no AEM site means UE has nowhere to save. An AEM site with no repo of your own means UE only shows the default boilerplate blocks. The bridge between them is a Cloud config value we set a little further down.
This decoupling is actually a feature: you can point any provisioned AEM site at any GitHub repo. We used exactly that to attach our own eds-poc repo to a trial-provisioned site.
Provisioning the AEM Author Site
Before Universal Editor can save anything, you need an AEM site whose pages have the correct jcr:content node structure. There are two ways to get one.
Option A — Pre-built UE trial (recommended to start)
- Go to
https://www.aem.live/developer/ue-trial - Fill in your details, including your GitHub ID
- You receive an email with your AEM author host, preview/live URLs, and a repo under Adobe's
aemsitestrialorg
The trial provisions a site from the correct template, so its pages work with UE out of the box.
Gotcha we hit — you cannot clone the trial repo. It lives under Adobe's
aemsitestrialorg and your SSH keys have no access ("Repository not found", HTTPS hangs on auth). Do not fight it. Use your own repo, put your blocks there, and repoint the site's Cloud config (next section). The AEM site and the code repo are independent.
Option B — Site template import (full AEM access)
- Download the site template zip from
https://github.com/adobe/aem-boilerplate-xwalk/releases - In AEM: Sites → Create → Site from template → Import and upload the zip
- Fill in the site title and name
Gotcha we hit — the "Import" button is missing on trial/sandbox instances. If you do not see it, you are on a restricted instance. Use Option A instead.
Why this matters: pages created by hand through Sites → Create → Page do not get the node structure xwalk needs. They look fine in the console but throw a 404 on jcr:content.json the moment UE tries to add a block. Always start from a templated or provisioned site.
The Cloud Config Bridge — Pointing AEM at Your Repo
This is the single setting that connects your provisioned AEM site to your GitHub repo. Get it wrong and your custom blocks silently never appear.
- In AEM: Tools → Cloud Services → Edge Delivery Services Configuration
- Open the config for your site and edit its properties
- On the Site tab, set:
- Organization → your GitHub org/username (e.g.
naveenrapelly34) - Site Name → your GitHub repo name (e.g.
eds-poc) - Public URL →
https://main--<repo>--<org>.aem.page
- Organization → your GitHub org/username (e.g.
- Save & Close
Universal Editor decides which blocks to show by fetching:
https://main--{Site Name}--{Organization}.aem.page/component-definition.json
So these two fields literally decide whose component-definition.json UE loads.
The mistake that cost us hours: Site Name is your GitHub repo name, not your AEM site name. Our AEM site was
astutejaguar70099but our repo waseds-poc. With Site Name set to the AEM name, UE fetched acomponent-definition.jsonthat did not exist, and only the default Text/Image/Title blocks showed up. Changing Site Name toeds-pocmade every customadc-*block appear immediately.
The Boilerplate Repository
Adobe provides a starting point called aem-boilerplate. For Universal Editor (xwalk) projects, the correct starting point is aem-boilerplate-xwalk.
https://github.com/adobe/aem-boilerplate-xwalk
This repository contains:
- The foundational
scripts.jsandaem.jsthat power all EDS sites - Example blocks: hero, cards, columns, footer, fragment
- The
component-definition.json,component-models.json, andcomponent-filters.jsonfiles needed for Universal Editor - The
fstab.yamlconfiguration file you must update for your project
Do not build from scratch. The boilerplate contains carefully tuned performance optimizations in scripts.js that are difficult to replicate correctly.
Understanding fstab.yaml
The fstab.yaml file is the most important configuration file in your project.
It tells the EDS Edge Network where to fetch your content from when a request comes in.
A typical xwalk fstab.yaml looks like this:
mountpoints:
  /:
    url: "https://author-p{program}-e{environment}.adobeaemcloud.com/bin/franklin.delivery/{owner}/{repo}/main"
    type: "markup"
    suffix: ".html"
Let's break this down:
| Field | Meaning |
|---|---|
mountpoints | Maps URL paths to content sources |
/ | The root path — all pages are fetched from this source |
url | The AEM Cloud delivery endpoint |
type: markup | EDS expects HTML content (not JSON or plain text) |
suffix: .html | Appended to page paths when fetching from AEM |
How a Page Request Uses fstab
When a user visits https://main--eds-poc--yourname.aem.live/adc-test:
- The EDS edge network receives the request for
/adc-test. - It reads
fstab.yaml: the root is mapped to the AEM Cloud endpoint. - It fetches
https://author-pXXX-eYYY.adobeaemcloud.com/bin/franklin.delivery/owner/repo/main/adc-test.html. - AEM returns the page HTML.
- EDS caches and delivers it.
If the fstab.yaml URL is wrong, no page on your site will load. The error will look like a 404 or a blank page depending on what AEM returns.
Common fstab Mistakes
Mistake 1: Wrong program/environment IDs
# Wrong
url: "https://author-p999999-e888888.adobeaemcloud.com/..."

# The program and environment IDs must match your actual AEM Cloud instance
Check Cloud Manager for your correct program and environment IDs.
Mistake 2: Wrong owner or repo name
The {owner} and {repo} values in the URL must match your GitHub username and repository name exactly. Case sensitive.
Mistake 3: Using the publish URL instead of the author URL
For xwalk projects, the fstab.yaml points to the author instance, not publish. This is intentional. The bin/franklin.delivery servlet on the author instance handles preview and live delivery separately.
fstab.yamlis not a universal EDS rule. For the Universal Editor/xwalk setup in this series, the current Adobe tutorial configuresfstab.yamlagainst the AEM author service. That does not mean every EDS architecture depends onfstab.yamlforever — different EDS versions and authoring models can use different content-source configuration. When this series refers tofstab.yaml, it means the configuration used by the Universal Editor/xwalk project we are building.
The aem-code-sync GitHub App
The aem-code-sync app is a GitHub App installed on your repository. It connects your GitHub repository to the AEM Edge Network.
When you push code to the main branch of your repository, aem-code-sync detects the change and updates the edge network so your new blocks, styles, and scripts are available immediately.

Installing aem-code-sync
- Navigate to
https://github.com/apps/aem-code-sync - Click Install
- Select your GitHub account
- Choose Only select repositories and select your EDS repo
- Click Install
After installation, every push to main is automatically synchronized.
You do not need to run any build step. There is no npm run build for production. The code in your GitHub repository IS the production code. EDS loads your JavaScript and CSS files directly by URL.
This is a significant architectural choice. It means:
- No compilation step required
- No bundling required
- No deployment pipeline for code changes (just
git push) - Developers can see changes in preview within seconds of pushing
The Local Development Server
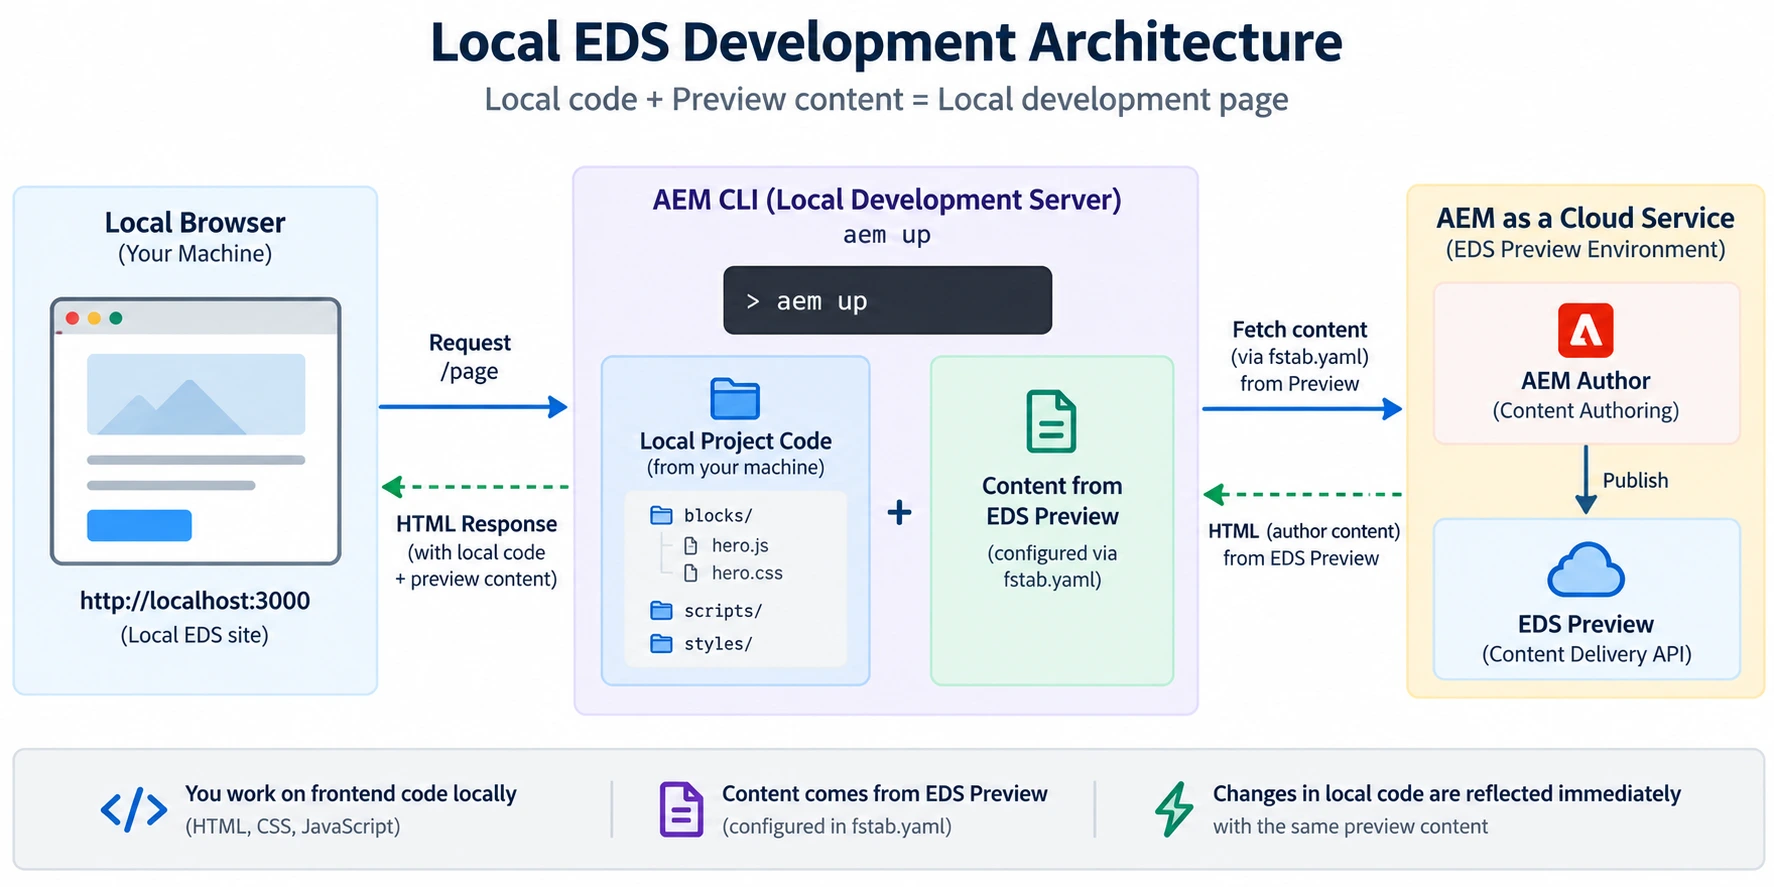
During development you do not want to push every change to GitHub to see the result. The aem CLI provides a local development server that proxies requests to your live preview site.
npm install
aem up
This starts a local server at http://localhost:3000.
What aem up Actually Does
Many developers assume aem up serves files from their local disk only. This is incorrect.
aem up proxies HTML content from your preview URL (.aem.page) and serves your local code files (blocks, scripts, styles) from disk. The browser talks to the local server, which fetches HTML from the preview site and serves JS and CSS from your local blocks/, scripts/, and styles/ folders.
This means:
- Content changes (page edits in UE or DA) require a preview/publish action before they appear locally
- Code changes (JS, CSS, JSON) appear immediately on save — no restart needed
- You need an active internet connection — the HTML comes from AEM Cloud, not from disk
Practical Implication
If you edit a block's JavaScript file and reload localhost:3000, your change appears immediately.
If an author edits a page in Universal Editor and you reload localhost:3000, you will not see the change yet. The author must first click Preview in the Sidekick to push the content to .aem.page, and then your local server will pick it up.
This surprises many developers the first time they encounter it.
The Configuration Files for Universal Editor
If you are using Universal Editor (xwalk), your project has three additional JSON files that define what authors can edit and how the editor presents it.
component-definition.json
This file is the registry of all blocks available in the Universal Editor sidebar.
{
  "groups": [
    {
      "title": "Blocks",
      "id": "blocks",
      "components": [
        {
          "title": "Hero",
          "id": "hero-banner",
          "plugins": {
            "xwalk": {
              "page": {
                "resourceType": "core/franklin/components/block/v1/block",
                "template": {
                  "name": "hero-banner",
                  "model": "hero-banner"
                }
              }
            }
          }
        }
      ]
    }
  ]
}
If a block is missing from this file, authors cannot add it from the sidebar. The block may already exist as a folder in your repository, but Universal Editor does not know about it until you register it here.
component-models.json
This file tells Universal Editor which fields appear in the properties panel when an author clicks on a block.
{
  "definitions": [
    {
      "title": "Hero Banner",
      "id": "hero-banner",
      "fields": [
        {
          "component": "select",
          "name": "size",
          "label": "Size",
          "options": [
            { "name": "Tall", "value": "tall" },
            { "name": "Medium", "value": "medium" },
            { "name": "Short", "value": "short" }
          ]
        },
        {
          "component": "aem-content",
          "name": "desktopImage",
          "label": "Desktop Image"
        }
      ]
    }
  ]
}
If this file has a JSON syntax error (trailing comma, missing bracket), the entire UE properties panel will crash with "Something went wrong" — not just for the broken block, but for every block on the page.
Always validate your JSON before pushing.
component-filters.json
This file controls which blocks are allowed to be added inside which containers.
{
  "definitions": [
    {
      "id": "section",
      "components": [
        "hero-banner",
        "cards",
        "columns",
        "adc-button"
      ]
    }
  ]
}
If a block is in component-definition.json but not in component-filters.json under section, authors will see it in the sidebar but will not be able to add it to a page. It will appear greyed out.
The models/ Folder
Individual block models can be stored inside each block's folder as _block.json, or they can be stored in the top-level models/ folder as reusable fragments.
The models/ folder contains shared field definitions that multiple blocks can reference:
models/
├── _button.json        ← Reusable button fields
├── _image.json         ← Reusable image fields
├── _text.json          ← Reusable rich text field
├── _page.json          ← Page-level metadata
└── _section.json       ← Section-level fields
When multiple blocks need the same field type (for example, all blocks that have a CTA button), you define the field once in models/ and reference it from each block's model.
helix-query.yaml
This file configures the query API for your EDS site. It allows you to create structured queries against your content — for example, fetching all pages tagged with a certain category for a blog listing.
For most projects in the beginning, you do not need to modify this file. The default configuration supports the most common use cases.
head.html
This file is injected into the <head> of every page on your site.
Common uses:
- Adding custom fonts via
<link rel="preconnect"> - Adding a
<meta>tag for a third-party verification - Loading a global analytics script
Be careful what you add here. Anything in head.html runs on every page. Render-blocking resources added here will hurt your Core Web Vitals scores across the entire site.
The Complete Request Flow During Development
Now that you understand all the pieces, here is how a complete development request flows. You request localhost:3000/adc-test; aem up fetches the HTML from main--eds-poc--yourname.aem.page/adc-test; that HTML arrives with block tables such as <div class="hero block" data-block-name="hero">...</div>; the browser loads scripts.js from your local disk, which discovers the .hero.block element, loads your local blocks/hero/hero.js, runs decorate(block), loads your local blocks/hero/hero.css, and the page renders with your local code against AEM content.

This is why you can iterate on block code instantly without touching the content.
Common Setup Errors and How to Diagnose Them
Error: Blank page or 404 on localhost
Most likely cause: fstab.yaml URL is wrong or the preview site is not set up.
Diagnosis:
- Open
fstab.yamland copy the URL - Append your page path:
.../main/your-page.html - Open that URL directly in the browser
- If you get a login prompt or 404, the fstab URL is wrong or your AEM instance is not accessible
Error: Block exists but doesn't run
Most likely cause: File naming mismatch, or export default missing.
Diagnosis:
- Open browser DevTools → Network tab
- Filter by JS
- Look for
blocks/your-block/your-block.js - If the file loaded but block didn't decorate: check the console for errors
- If the file did not load: the block name in the HTML does not match the folder name
// This will NOT work (named export)
export function decorate(block) { ... }

// This WILL work (default export)
export default function decorate(block) { ... }
Error: UE properties panel shows "Something went wrong"
Most likely cause: JSON syntax error in a model file.
Diagnosis:
- Open browser DevTools → Console tab
- Look for a JSON parse error with a file path
- Open that file and look for:
- Trailing commas after the last item in an array or object
- Missing closing brackets or braces
- Single quotes instead of double quotes
Even one character error in any JSON file connected to the UE will crash the entire properties panel.
Error: Code changes don't appear on preview
Most likely cause: You changed a JS or CSS file but the edge network is serving a cached version.
Diagnosis:
Add ?nocache=1 to the preview URL, or use the Sidekick to explicitly preview the page again.
For local development, hard refresh with Cmd+Shift+R (Mac) or Ctrl+Shift+R (Windows).
Error: Author edits not visible locally
Most likely cause: The page has not been previewed after the edit.
Diagnosis:
In Universal Editor or DA, the author must click Preview (or the equivalent action) to push content to .aem.page. Until that happens, localhost:3000 will show the previous version.
Error: Custom blocks missing from the Universal Editor picker
Most likely cause: The Edge Delivery Services Cloud config has the wrong Organization or Site Name, so UE is loading the wrong component-definition.json.
Diagnosis:
- Open
https://main--{Site Name}--{Organization}.aem.page/component-definition.jsondirectly in a browser - If it 404s, or shows the boilerplate blocks instead of yours, the config is wrong
- Fix Organization and Site Name (Site Name = your GitHub repo name) in Tools → Cloud Services → Edge Delivery Services Configuration
Error: 404 on jcr:content.json when adding a block
Most likely cause: The page was created by hand through Sites → Create → Page and lacks the xwalk node structure.
Diagnosis: Recreate the page under a properly templated/provisioned site (Option A or B earlier in this chapter). Manually created pages cannot be saved by UE — they 404 the instant you drop a block on them.
Error: CRXDE returns "No resource found"
Cause: CRXDE (/crx/de) is disabled on AEM as a Cloud Service by design — it only exists on the local SDK.
Workaround: Inspect content through the developer console or the content API instead of CRXDE.
Error: Lint fails on BEM class names
Most likely cause: stylelint-config-standard enforces kebab-case and rejects BEM __ and -- (for example .o-form__wrapper, .btn--primary).
Fix: Rename to plain kebab-case (.o-form-wrapper, .btn-primary) in both CSS and JS, or override the selector-class-pattern rule. Remember to update every classList, querySelector, and className reference so nothing silently stops matching.
The Sidekick Extension
The AEM Sidekick is a browser extension that authors and developers install to manage the content lifecycle.
Key actions available in the Sidekick:
| Action | What it Does |
|---|---|
| Preview | Pushes content from author to .aem.page |
| Publish | Pushes content from preview to .aem.live |
| Delete | Removes a page from preview and live |
| Unpublish | Removes a page from live but keeps it in preview |
As a developer, you will use Preview frequently during development to pull the latest authored content to your local server.
Validate the Setup Baseline Before Building
Before building the first custom block, get these checks to pass. If the first block fails later, you want to debug the block — not wonder whether the repository, content source, authoring setup, or local environment was wrong from the start.
Code project
- repository created from the correct xwalk boilerplate
aem-code-syncinstalled on the repository- repository cloned locally
- dependencies installed
AEM
- AEM site created from a template or provisioned trial
- site path matches the project configuration
- content exists
- Universal Editor can edit the site
Project configuration
fstab.yamlpoints to the expected AEM author/project context- the Cloud config Site Name is the GitHub repo name
- branch configuration is understood
Local development
- the AEM CLI works
aem upstarts without errors- the local site opens
- local frontend changes reload correctly
Content delivery
- content can be published to Preview
- local development can consume Preview content
- the Preview page can be validated
- Live publishing is understood separately
When all of those work, the baseline is complete.
What Not to Do Yet
At this stage, resist:
- redesigning the boilerplate
- creating multiple custom blocks
- adding third-party JavaScript
- building API integrations
- changing the global loading strategy
- introducing a frontend framework
- creating generic abstractions
- performance tuning
None of that proves the initial connection works. Establish a working baseline, then change one thing at a time. That makes the rest of the project far easier to debug.
Developer and Architect Perspective
For a developer, the setup makes the EDS boundary concrete. The Git repository owns the frontend implementation. AEM author owns the authored content. Universal Editor gives authors the editing experience. Preview gives a controlled delivery state for validation. The AEM CLI gives a local environment that combines local frontend code with EDS-delivered content. Once those responsibilities are clear, the setup stops feeling like several unrelated Adobe services — each piece has a specific job.
For an enterprise implementation, it is worth documenting more than "localhost:3000 works":
- GitHub organization and repository ownership
- who can install or configure
aem-code-sync - repository permission model
- branch strategy
- the AEM environment used as the content source
- site-to-repository mapping
- Preview and Live publishing responsibilities
- production domain ownership
- configuration ownership
- developer onboarding steps
Platform configuration evolves while the business architecture may live for years, so record the EDS version and authoring model in use rather than assuming every future site uses the same content-source setup.
Key Takeaways
- Three systems must connect: GitHub (code), AEM Cloud (content), EDS Edge Network (delivery)
- Two artifacts, loosely coupled: your GitHub repo (delivery) and a templated AEM site (authoring) — you need both, and the Cloud config bridges them
- Site Name in the Cloud config is your GitHub repo name, not the AEM site name — get it wrong and custom blocks never appear
- Pages must come from a template or provisioned site — hand-created pages 404 on
jcr:content.jsonin UE - CRXDE is disabled on AEM as a Cloud Service — it only exists on the local SDK
fstab.yamlis the most critical config file — a wrong URL breaks every pageaem-code-synclinks GitHub to the edge — no build step,git pushis deploymentaem upis a proxy server, not a static file server — HTML comes from.aem.page, code comes from disk- Content changes require a Preview action before they appear locally
- Three JSON files power Universal Editor:
component-definition.json(registry),component-models.json(fields),component-filters.json(placement rules) - A JSON syntax error in any model file crashes the entire UE properties panel
- Block JS must use
export default function decorate(block)— named exports do not work - Block folder name must exactly match the CSS class in the HTML — case-insensitive but hyphen-sensitive
fstab.yamlis specific to the Universal Editor/xwalk setup — not a universal rule for every EDS architecture- Validate the setup baseline before building — repository, AEM site, configuration, local dev, and content delivery should all work first
- Establish the baseline, then change one thing at a time — a working baseline makes every later block easier to debug
- Each layer owns a responsibility — Git owns frontend code, AEM author owns content, Preview and Live are delivery states
Next Steps
In the next chapter, we will cover the most important concept in EDS development: Blocks.
We will cover:
- The anatomy of a block (JS, CSS, JSON model)
- How
scripts.jsdiscovers and loads blocks - The
decorate(block)function and how to use it correctly - Reading key-value content from the block DOM
- Building your first block from scratch
- The difference between
key-value: trueblocks and regular multi-cell blocks - Common block mistakes that cause silent failures
Enjoyed this chapter?
Get an email when I publish the next chapter. No spam — just new technical deep-dives.
Comments
Share feedback or questions about this blog post.
No comments yet. Be the first to share your thoughts.